Showing posts with label Crafts. Show all posts

Wednesday, February 5, 2014

2014 Winter Olympic Craft Ideas

I love when the Olympics come around and the winter Olympics are my favorite! When it comes to homeschool, there are endless things to teach the kids about. The history of the games, the countries participating, the sports, and maybe I can even go over the Nancy Kerrigan/Tonya Harding drama!...No? Yeah. I guess It's probably a little too much for my 5 and 8 year olds ;)

So now I'm on the look out for some good crafts that we can do along with the lessons. Here's what we made during the 2012 summer Olympics.

Olympic Ring Cupcakes

Olympic Ring Cupcakes.
Olympic Medals

Look how little they all were!
Directions:

-Use a round cookie cutter to shape your favorite cookies.


-Wrap the cookies in foil


-Trace your round cookie cutter onto the back of gold and silver card stock. 2 circles for each medal. *I bought my paper from Michaels


- Tape Olympic themed ribbon to one side of the wrapped cookie than tape 1 card stock circle over it. Tape the other circle to the other side of the cookie.


Although, I like to use any excuse to make cupcakes, I don't really want to do the same crafts for this Olympics. I'm thinking something winter themed...and edible ;)

Are you doing anything fun with your kids to celebrate the Olympics?

Tuesday, October 1, 2013

DIY Halloween Jello Worms

Nobody likes me, everybody hates me, I think I'll go eat worms! Big fat juicy ones, Eensie weensy squeensy ones, See how they wiggle and squirm!

Jello Worms

These realistic looking Jello worms are a perfect Halloween treat!

Ingredients:

2 packs of raspberry Jello 

1 pack of unflavored gelatin (The Knox brand comes in a box with 4 packs. Use only 1 of those packs)

3 cups of boiling water

3/4 cups of whipping cream

Green food coloring

100 flexible straws

1 tall container around the same width/height as the 100 straws

Directions:

Combine 2 packs of raspberry Jello and 1 pack of unflavored gelatin with 3 cups of boiling water.

Mix for 2 minutes then let cool in until lukewarm.

Mix in 3/4 cup whipping cream.

Mix in enough drops of green food coloring to make a worm color - about 10-15 drops

Flex out all the straws and place them into the container (flexible side down making sure there's a tight fit) I wrapped them with a rubber band to help with this.

Pour Jello mixture as evenly as possible over the straws.

I got nervous when a lot of my mixture seemed to come right out of the bottom of the straws. Although they didn't fill the straws, I still ended up with good sized Jello worms.
I should have used a taller container but this is what I had
 Refrigerate for 8 hours or overnight.

To remove the Jello from the straws, run a few straws under warm water for a couple of seconds then squeeze them out into a bowl.

I think I may make cupcakes for Halloween and top them with Oreo cookie crumbs and these beauties :)

I bite off the heads, and suck out the juice, And throw the skins away! Nobody knows how fat I grow, On worms three times a day! 

Friday, July 26, 2013

Mod Podge

*This is a post I wrote a while ago for TPW which is going to be shutting down soon :(

Recently we moved our 11-year old into his own room. Right away he decided he was too cool for his old spaceship theme decor and wanted something different. Right away, I had a mini heart attack! Have you seen the prices for things like bedding and curtains lately!? I was not OK with spending hundreds of dollars on my kid's bedroom and was determined to figure out how to do it for less.

He wanted it to have an army theme and I thought that was perfect. With a few camo accents here and there, and a neutral colored comforter I'd be able to pull it off with out having to sell my right leg :)

My first idea was sprucing up the out-dated ceiling fan. I looked high and low until I finally found some camo scrapbook paper at Hobby Lobby. I had never used Mod Podge before but I've been itching to try it out for a long time!

First I removed the blades from the ceiling fan (and taking off all the hardware) then traced the fan blade on the back of one of the cameo scrapbook pages.

After cutting the paper to fit the blade, I used a small paint brush to cover the back of the camo paper with Mod Podge and carefully placed stuck it to the blade. Once in place, I gently smoothed the paper to get rid of any bumps or creases then let it dry for about 10 minutes.

Next I painted on another layer of Mod Podge over the top of the camo paper then let that dry for another 10 minutes.

When all the blades were done I just put the hardware back on and screwed the blades back onto the fan.

                                    Camo Ceiling Fan For About $8


I also used the same idea on his light switch plate for less than $1

Mod Podge is addicting! I find myself looking at things and the house and thinking, I could totally Mod Podge that.

I'm happy about the way they turned out and even more happy with the price :) Next on the list is curtains and bedding.

Friday, June 21, 2013

DIY Traveling Lego Box

I'm always on the lookout for "quiet" toys to bring to places like church or elsewhere that require my kids to sit quietly for more than 5 minutes. In the past I've vetoed Legos because if you've ever heard a bag of Legos being poured out in the middle of church you'll agree they're NOT quiet. They also don't travel well. Usually they end up spreading out all over the van floor never to be found again.

I came across a great idea for a traveling Lego box on line but wanted to adapt it to be a bit more 3 year old friendly (their box looked hard to open) and....quiet :)  Here's what I came up with.

                                DIY (Quiet) Traveling Lego Box


What You'll Need


Wood box (with latch) I found mine at Michaels

1 Square of felt

1-2 Lego Baseplates

Hot glue

Paint/brush *optional

Directions

Paint the wooden box the color of your choice

After the box is dry, hot glue Lego baseplates to the top of the box

Cut a piece of felt to fit in the bottom of the box then hot glue it to the bottom

Fill with Legos


Houston (3) loves his new Lego box! His little creations stick to the baseplate, though he can still open the lid and look for pieces.

My favorite part though is that the felt on the bottom helps keep the Legos from clattering around.

Tuesday, June 18, 2013

DIY Monster Jean Patch

A blog that I used to write for is sadly coming to an end :( As I went back and read some of the blogs that I wrote there I was sad at the thought of them just dying with the site. They're all like my little babies! So I'm bringing them over here where they can live long lives with all my other little babies. I hope you don't mind when you see one popping up every once and awhile :)

 It's that time of year when I go through my kid's summer clothes and replace them with fall and winter clothes. It's also that time of year when I cringe at the amount of money we'll need to spend to make sure they have everything they'll need! That includes replacing the perfectly nice jeans that still fit but have holes at the knees. This year instead of trashing those jeans and replacing them I have a new plan!

Don't trash those jeans! Patch them! 

DIY Monster Patch
The eyes are like that on purpose. My boys wanted "crazy eyes" 


Supplies:

Jeans with a hole

Your choice of colored felt

Needle and thread (Or iron-on interfacing)


Directions:

To make the mouth, cut out a circle of felt a little bigger than the hole in the pants.

Cut out teeth and eye shapes

Sew the teeth to the top of the mouth

Sew the mouth/teeth felt to the inside of the pants (You could use iron on interfacing instead but I've found sewing it holds better)

Sew on the eyes


My boys had fun picking out the colors for their monsters and have been wearing their jeans...a lot. Which means I've put them through the wash a couple of times and they've held up fine. Just make sure to stitch those eyes on really good.

Tuesday, January 8, 2013

Mom Has A New Trick Up Her Sleeve

Because of the holidays and a death in the family, today is our first day doing homeschool in about 3 weeks. While we were getting ready to start, Logan said that he was actually excited and Ethan said he couldn't remember why he used to not like school. I guess a break did us all some good :)

...

And then reality hit! 

After writing those words I had to stop to break up a couple of arguments and a temper tantrum. You would probably guess that it was my 4 year-old that had the tantrum.  You would be wrong. After I asked my 9 year-old to "add just a couple more sentences" to the book report he was writing, he lost it. He went up to his room, laid in his bed, and acted like a 2 year old who dropped his ice cream cone! Complete with crying, screaming, and pounding his fists! 

After a few minuets I went up stairs and told him that his behavior was not acceptable. Crying when you're upset is one thing, but acting the way he did was not! He seemed to understand.

Then it was back down the stairs to find another child playing instead of doing math.

Three weeks is too long to be away from our routine. The kids need some re-adjustment and I need some new tricks.

                                                                  Good Behavior Jar


I saw an idea like this on Pinterest and thought I'd try it. It's a little old school but sometimes that's the best stuff!

I made it by putting some stickers that say "you rock" on a small vase and using decorative rocks to keep track of  the good behavior.

I told them that when the jar is full I will give them a surprise. I'm thinking something like a trip to Chuck E Cheese

I want it to be all positive so I won't be removing rocks for bad behavior. Rocks will be added when I catch them doing things like:

  • Being kind to someone
  • Being helpful
  • Saying nice things to their siblings
  • Doing things without being told 
etc.

When I explained the rules they asked if they could have a smaller reward if they just fill it half way...Doesn't sound like they're too optimistic :/

I'll keep you updated.

Friday, July 13, 2012

Chalkboard Paint SOMETHING!

*For those of you who don't follow The Poop Whisperer yet, here's my most recent post.*


See? Ryan gets me. He knows that in order to be officially welcomed into the crafty girls club you HAVE to use chalkboard paint on something! It could be anything from entire bathrooms, fridges, birth announcements, or furniture.

I wanted whatever I used chalkboard paint on to be useful. Because besides keeping track of your child's BMs, how useful can a chalkboard in your bathroom be?

The kitchen in our ghetto-fabulous house isn't very big. It's only saving grace is the pantry. This area has been used for everything from food storage to a makeshift jail for the dogs. The pantry is also the area that you look directly into when you enter through the back door which made it the perfect place for my project.

First, I picked up this small can of chalkboard paint from Lowes. *Walmart didn't have any.
I was a little worried that it wouldn't be enough for 2 coats, but I ended up having more than enough. It covers 10x10 ft according the can (or 5x10 for two coats)

If you've ever painted a wall, you can use chalkboard paint. Just be sure to follow the directions on the back of the can.

In the pictures the wall look kind of gray but it's a nice black in reality. I love the way it turned out! And it's been useful in many ways.

#1. As a place to write lists...

#2. Leave notes...

#3. An OK place for the kids to write all over the wall...

#4 (Not pictured)  Love notes...

When I came home the other day my husband had written, "If I tell you I love you can I keep you forever?"

He totally got that junk off the Internet. Whatever...It worked :)

So now that I've chalkboard painted something I'm going to officially welcome myself into the club of crafty girls! In my acceptance speech, I'd like to thank my boyfriend Ryan for his good looks support.
--------------------------------------------------------------------
Have you used chalkboard paint on anything? I'd love to hear your ideas. Now that I've tried it I want to use it on everything!

*Sorry for the bad pictures. The space is really dark. Aaaannnd I stink at taking pics. ;)

Wednesday, June 20, 2012

If You Came Over For Coffee

We don't have company very often. It's not that we don't have any friends, it's just that we never invite them over. Part of the reason is that weekends are the busiest time for us. By the time I get done running around on Saturday the last thing I want to do is company clean. The kind of cleaning that means that I'd have to fold all those clean clothes instead of leaving them in baskets around the living room. Yeah. Not feeling it.

So since no one ever comes over, no one gets to see the awesomesauce wreaths that I've been making...Except maybe the mail man. Although that would mean he would have to step into our front porch and that would be a weird.


So, friends. Would you like to come over for coffee?

Come on in...

-Oh. What was that? You like my wreath?

-Thanks. I just threw it together in my spare time.

-Then you would ask me how I keep my house so clean with 4 kids running around.

-I would pretend like it's this clean all the time and you would wonder why my kids look like deer caught in the headlights.

-It's because 2 minutes before you got here, I was screaming like crazy for Houston to put some clothes on, while trying to fit 3 baskets of laundry on the side of my bed that you can't see from the door.

-The kids will play upstairs while we chat about kids and life over coffee and homemade cupcakes.

-Then it would be time for you to leave.

-On your way out you would comment on my lovely wreath again.

-Before you were out of the driveway, Houston would have taken all his clothes off and the laundry baskets would be back to their home on the couch.


Tuesday, May 22, 2012

Homemade Bar Soap at TPW

Come over to The Poop Whisperer and check out my post on how to make Homemade Bar Soap.

IMG_3219

It's a good craft to do with your older kids who could use a good bar of soap ;)

Monday, May 7, 2012

Unique DIY Mother's Day gift for $10

I have this blog scheduled to post over at The Poop Whisperer on Wednesday but I'm giving you peeps an advance screening :)
-----------------------------------------------------------------------------------
While looking for a gift to give my own mother on Mother's Day I came across this idea.
Source
When I pinned this idea to my Pinterest board, it was re-pinned 314 times!! Looks like I'm not the only mom who loves these homemade gifts :)

This kit is selling for $39.95 but I knew I could do it cheaper. My total cost was around $10 after my Michaels coupon.


Supplies:


Directions:

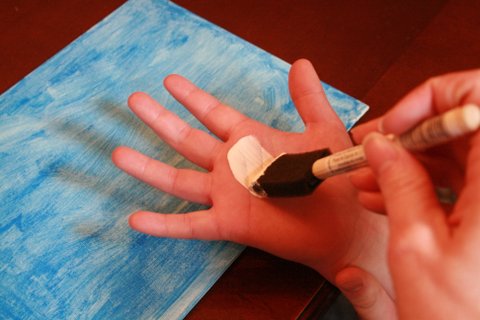
Have your child paint their canvas with the finger paint. *We did two coats of paint*
When the canvas is dry, paint your child's hand with a contrasting color...

And help them press their hand on the middle of the canvas.
Write your child's name/age in the corner of the canvas.
------------------------------------------------------------------------------------------------------
With the extra canvas, I had a friend (who has really nice handwriting) write this sweet poem.

Sometimes you get discouraged because I am so small. 
And always leave my fingerprints on furniture and walls.
But every day I'm growing. I'll be grown some day.
And all those tiny hand prints will surely fade away.
So here's a little hand print, just so you can recall
exactly how my fingers looked when I was very small.

Time really goes by too fast. Before we know it they will be grown and out on their own. Well unless they move into your basement and claim they have "squatter's rights."

I love the way this turned out. Soooo...I think I'm going to keep it for myself. I'll find my mom another gift :)


”vintagemauve.com”

Thursday, March 29, 2012

Upcycled necktie t-shirt

I found the idea for this upcycled necktie t-shirt on this blog. I feel in love! I love the idea of turning an old tie into something cute and feminine.

Tie- $2 at Goodwill
          +
Shirt-$5 Walmart

         =
I think it turned out pretty nice. My husband kind of popped my bubble when he gave me that "I don't like it" look.

So what does a girl do when she needs a second opinion? She posts the question on FB :)

All the ladies seemed to like it. The men were so-so about it. One of my girlfriends suggested that men don't really like things that are different.

I think I'll keep it :) I may even keep an eye out for some different ties to try it out with.


Tuesday, February 21, 2012

DIY Glow in the Dark Slime

Lets be honest. Kids love things that are green and slimy! When you can make that stuff glow in the dark you become the coolest mom in the world!

Glow in the dark slime


What you'll need:
  • One 4 oz bottle of clear or blue gel Elmer's glue
  • 1 cup of warm water
  • 3 tablespoons of glow-in-the-dark paint *Found mine at Michael's*
  • Green neon food coloring *Optional*
  • 2 teaspoons of Borax
  • 1/3 cup of warm water
Directions:

1) Mix together the Elmer's glue and 1 cup of warm water. Then mix in the paint and food coloring (optional).

2) In a separate bowl, mix together the 1/3 cup warm water and 2 teaspoons of borax. Stir until the borax is dissolved.

3) Add about 2 tablespoons of the borax solution (you wont need the rest) to the glue solution stirring continuously.

After stirring for a few seconds you'll notice it all start sticking together. And then you'll have your glow in the dark slime! 

  Enjoy being the coolest mom ever!

Tips:
The more food coloring you add, the less "glow in the dark" it will be. I added a lot. It was a very cool neon green color but didn't glow very strong.

This may not be safe for really small children who might put the slime in their mouths. 


Friday, February 3, 2012

5 Days Of Valentines Day Crafts...Day 5

Day 1


Day 2


Day 3


Day 4

Can you feel the love yet people?! I know I do ;)

Today I have not one, but TWO crafts for you. Why? Because I may have a gone little over board and tried enough Valentines crafts to fill up at least a week! Don't worry though. Maybe I'll save those for next year ;)

Valentines Day 5: Homemade (heart shaped) crayons and personalized candy bar wrappers.
                                                                                      
Homemade Crayons. 


What you'll need:

Crayons. If you're anything like me then you have a plethora of broken, used crayons just laying around your dinning room floor.

Heart shaped mini muffin pan, candy mold, or silicone tray.

First,preheat your over to 275 degrees.

Next, peel and break the crayons into small pieces. My kids loved helping with this part!
Then fill up the your pan or candy mold with the broken pieces. Make sure you have a good mix of colors in each cup.

Place the pan on a cookie sheet and into the preheated oven for 10-12 min. or until they're melted. *I watched them like a hawk*

Remove the pan and place it in the fridge for about 10 min. to cool.

When they've completely cooled they should just pop right out of the pan.
I used these to make my gang little Valentines that said "You color my world." They've been making pretty rainbow pictures ever since.

Personalized Candy Bar Wrapper. 


What you'll need:

1.55 oz. Hershey bars

Candy bar wrapper template I used this one.

Scrapbook paper and stickers

This one was really easy! I loved the fact that I could personalize each wrapper for each kid. I'm going to keep the template to use again later for gifts and party favors.

First, I printed out the template and traced it onto scrapbook paper then cut it out.

Next, I decorated each wrapper with stickers and ribbon.

Then I wrapped the bars and closed up the back with a bit of tape.

I loved making these crafts with and for my little Valentines. Seeing them get excited about each gift was worth every minute I spent making them.

Have a wonderful Valentine's Day!